You can import customer/vendor part number information from an Excel spreadsheet to display on the Customer/Vendor Specific Part Numbers screen, or you can export customer part number information from the Customer/Vendor Specific Part Numbers screen to an Excel spreadsheet.
This process does not require the use of Mass Load to populate the Customer/Vendor Specific Part Numbers screen. Collect part number information from your customer in Microsoft Excel, save the file in tab-delimited text (.txt) format, and import it. To accurately import selected information, you must map column headings from the import file to Eclipse's field names on the Customer/Vendor Specific Part Numbers screen.
Exporting customer part numbers requires no additional file manipulation or Eclipse setup before exporting data directly to an Excel spreadsheet.
From the Files menu, select Customer to display the Customer Maintenance screen.
In the Customer field, enter the customer ID to display the customer record.
Use the Part # hot key to display the Customer/Vendor Specific Part Numbers screen.
Use the Excel Import or Excel Export hot key, depending on which process you want to use:
Save the Excel spreadsheet you want to import in tab-delimited text (.txt) format.
Display the Customer/Vendor Specific Part Numbers screen as described above, and use the Excel Import hot key to display the Excel Import screen. The following read-only data displays, along with lists of columns to import and export:
Use the Data Info hot key to display the Data Import Information screen, and set up the fields as needed:
|
Field |
Entry |
|
Import Type |
Press F10 and select one of the following to determine if the system updates product records upon import:
|
|
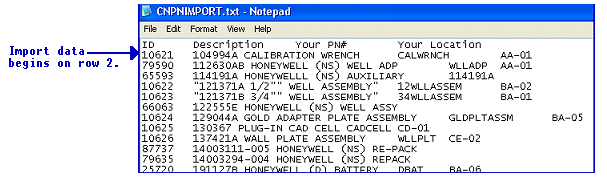
Start Column Import on Row |
Enter the row number from the spreadsheet from which to start importing product information. For example, if the spreadsheet has column headings on the first row, enter 2 in this field to skip the heading row. |
|
Use User Defined Column Headings (Y/N) |
Enter one of the following:
|
|
Column Headings Located on Row |
Enter the row number where the user-defined headings appear on the import file. |
In the Columns Imported From Excel column, use the Arrow keys and Shift hot key to create a list of the Eclipse field names for the product information you want to import.
The Product ID item is required in the Columns Imported From Excel column for the system to match its product ID or description to the product information on the spreadsheet. The product ID can be the Eclipse part number or the exact product description.
You can use the Insert Blank hot key to add blank lines to this column only if the Use User Defined Column Headings field on the Data Info screen is set to N.
Use the following hot keys to organize the list in the order the information appears on the import document.
|
Hot Key |
Description |
|
Shift |
Moves a selected item from either column to the bottom of the other column. For example, if you do not want to import the Location item, select Location in the Columns Imported From Excel column, and use the Shift hot key to move Location to the Columns Not Imported column. |
|
Move Up |
Moves a selected item in the Columns Imported From Excel column up one position. |
|
Move Down |
Moves a selected item in the Columns Imported From Excel column down one position. |
|
Insert Blank |
Inserts BLANK COLUMN at the cursor's position in the Columns Imported From Excel column. Use this option for any column on the spreadsheet you do not want to import. The system skips those columns when importing. |
|
Recall |
Restores the list to its original or last saved version. |
If user-defined headings are defined, the spreadsheet headings display when you select an Eclipse field, and the Col field displays ### for each item in the list.
Note: The *Product ID item is required in the Columns Imported From Excel column for the system to match its product ID or description to the product information on the spreadsheet. The product ID can be the Eclipse part number or the exact product description.
If you entered Y in the Use User Defined Column Headings (Y/N) field in the Data Import Information screen, use the UD Column Header hot key to display the Import Column Heading screen, and map the column headings in the User Defined Column Heading field to the Eclipse field names in the Columns Imported From Excel field.
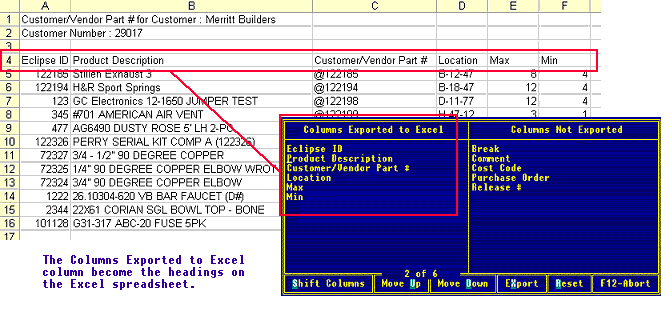
The Columns Imported From Excel field lists the field names from the Customer/Vendor Specific Part Numbers screen that represent the information to be imported.
Note: Only if you enter N for this field, can you use the Insert Blank hot key to add blank lines to the Columns Imported From Excel column.
Use the Import hot key to display the Select file screen, where you browse to select the text (.txt) file, and then click Open to import the file to the Customer/Vendor Specific Part Numbers screen.
From the Customer/Vendor Specific Part Numbers screen, use the Excel Export hot key to display the Excel Export screen.
In the Columns Exported to Excel field, use the Arrow keys and Tab key to navigate the columns, and use the following hot keys to list the Eclipse field names in the order you want them to appear on the exported spreadsheet:
|
Hot key |
Description |
|
Shift |
Moves a selected item from either column to the bottom of the adjacent column. For example, if you do not want to export the Location column, select Location in the Columns Exported to Excel column, and use the Shift Columns hot key to move Location to the Columns Not Exported column. |
|
Move Up |
Moves a selected item in the Columns Exported to Excel column up one position. |
|
Move Down |
Moves a selected item in the Columns Exported to Excel column down one position. |
|
Save |
Requires you to name the current import settings, so that you can recall the named version later by using the Recall hot key |
|
Recall |
Recalls previous versions of the import settings that were saved by using the Save hot key. |
Use the Export hot key to display the Select file screen, where you select a destination, name the file, and click Open to export the Excel spreadsheet to that location.
See Also: