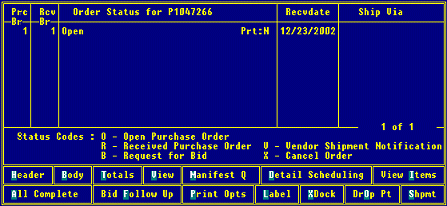
The Status screen details when and how shipments leave the vendor to get to you. You can modify the status, receive date or ship via, if necessary, although the system checks for valid status entries. You can also mark the shipment received and access the Cross Dock program.
Use the following codes to change the order status:
O – Leaves the order open.
R – Marks the order or generation received.
Note: When an order is received, the system updates the last cost. For more information on receiving purchase orders, see Receiving Purchase Orders in a Manual Warehouse.
B – Changes the order into a bid.
V – Indicates a vendor shipment notification has been sent.
X – Cancels the order. We recommend using the status screen in this manner to cancel an order.
Note: You can edit purchase orders and transfers attached to shipment only if they have a Received or Cancelled status. Otherwise orders attached to shipments are not editable.

You can use the Print Options hot key to print one or more generations of a purchase order. For more information, see Printing Purchase Orders. For more information on printing sales orders, see Reprinting Orders. To print labels, see Printing User-Defined Forms and Labels.
Note: The default print status override set in Vendor Maintenance is used when creating a new purchase order or creating a generation.
Printer location selection is based on a particular hierarchy. For purchase orders, the system first prints to the location assigned to the shipping branch in Printer Location Maintenance. If a location exists with the same shipping branch, then the user receives a prompt to select one of the following:
Print Locally – System uses the printer location assigned to the user.
Print Warehouse – System uses the printer location assigned to the shipping branch in Printer Location Maintenance.
In addition, you can print purchase orders by sending the order through e-mail to a user. You must have a control record set by Eclipse DMS customer support for this functionality to work. Once set, you can send orders and statements in the following ways:
Plain text, .html, or PDF attachments to the e-mail.
.tiff attachments to the e-mail
For complete details, see Attaching Text and HTML Documents to E-mails.
When using the print options, the system verifies that the order's value meets the vendor target, if specified on the Vendor Additional Information screen. If the target is met, the order prints. If not, a warning message displays: Vendor's Minimum Target of <vendor target> has not been met. The system also checks to see if you are authorized to release the purchase order and displays the message: You are <not> authorized. Enter Password to Override. The FREIGHT.TARGET.OVERRIDE authorization key must be set.
If you select a purchase order to receive and the status is Canceled, the following message displays: "You are about to reprint a purchase order that has been cancelled. Continue Y/N?"
Use the hot keys as described below, if needed:
|
Hot Key |
Description |
|
Header |
See POE Header Screen above. |
|
Body |
See POE Body Screen above. |
|
Totals |
See POE Totals Screen below. |
|
View |
Opens the order if view-only mode. |
|
Manifest Q |
|
|
Detail Scheduling |
|
|
View Items |
Displays product details. |
|
All Complete |
Completes all generations on the order. |
|
Bid Follow Up |
Displays associated bids on which to follow up. |
|
Print Options |
Print one or more generations of a purchase order. See explanation above. |
|
Label |
|
|
XDock |
|
|
Drop Pt |
See How Drop Points Maintenance Works in Purchasing or Overriding Drop Points on Purchase Orders. |
See Also:
Purchase Order Entry Body Attributes
Purchase Order Entry Header Attributes