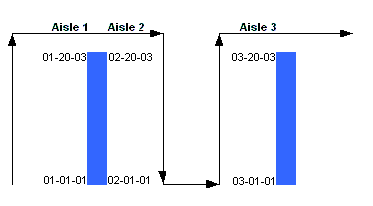
Pick sequences define the location order to pick or put away product. Use the Pick Sequence Entry screen to define put away and pick sequences for pick groups.
If you have defined pick sequences in Zone Maintenance, you do not need to recreate them on the Pick Sequence Entry screen.
To define put away and pick sequences, physically walk around each pick group in the sequence you want warehouse personnel to pick and put away product. Scan the beginning and ending locations to create a pick sequence.
Define pick sequences for one pick group at a time.
For example:
For a pick group, define the pick sequence for the following three location groupings:
01-01-01 to 01-20-03
02-20-03 to 02-01-01
03-01-01 to 03-20-03
After you define pick sequences for this pick group, define the next pick sequence for the next pick group.
On the Pick Sequence Entry screen, when you enter starting and ending locations for pick sequences, you must always enter the lowest number in the Str Loc field and the highest number in the End Loc field, even if you want the higher numbered location to be the starting position. To pick the high location first, enter D for descending in the SortOrdr field. The system begins the pick at the highest numbered location and ends it at the lowest numbered location.
For example:
Your beginning location for picking is 01-99-Z and your ending location is 01-01-A. Enter the following on the Pick Seq Entry screen:
Str Loc: 01-01-A
End Loc: 01-99-Z
SortOrdr: D
Your pick starts at location 01-99-Z and ends at 01-01-A even though it displays in Zone Maintenance as follows:
Begin Loca: 01-01-A
End Loca: 01-99-Z
Marking a pick sequence as descending (D) alerts the system to reverse the start and end locations. Marking a pick sequence as ascending (A) alerts the system to pick the starting and ending locations as entered on the Pick Seq Entry screen.
Use significant character numbers to automatically define an ending location after you define a beginning location.
The significant character number defines, from left to right of a location, which characters remain constant in the location and which characters count up.
For example:
For location 01-01-A, you enter the significant character number 3. The first three characters of the location are 01- and remain constant for the location. The characters 01-A count up in increments of one to the ending location, which is determined by the pre-defined maximum spaces allocated to the location format -99-Z in this example.
Using the above example, the system would determine the following ending location:
In the Sig Chars field, enter 3.
In the Str Loc field, enter 01-01-A as your starting location.
The system uses the first 01- as the first three characters for the ending location.
It then enters the maximum characters to define the rest of the location in the End Loc field: 99-Z.
The ending location is then 01-99-Z.
Using significant characters to automatically define an ending location is an option and not a necessity. You can manually define ending locations, as well.
To sequence a zone for put away and picking:
From the Warehouse Management > RF Applications > RF Main Menu > Misc menu, select Pick Sequence Entry to display the Pick Seq Entry screen.
Note: If prompted, log on to the character-based system.
In the Br field, enter the branch for which you are defining a sequence.
In the Sig Chars field, enter a significant character if you want the system to automatically define an ending location in the sequence. If you do not want to use significant characters, skip this step.
In the Str Loc field, scan the lowest numbered location for the pick sequence.
If you are manually defining an ending location (not using the Sig Chars field) do the following:
Walk to the ending location of that sequence.
In the End Loc field, scan in the highest numbered location for the pick sequence.
In the Pick Seq field, the system populates the next pick sequence available for the branch. If you want to define a different pick sequence, change this sequencing number.
In the Zone field, enter the zone that the pick group for which you are defining the pick sequence belongs.
In the Pick Grp field, enter the pick group for which you are defining this pick sequence, if necessary.
In the Exclude field, enter Y or N to indicate if you want the zone to be excluded from the RF Warehouse queue.
In the SortOrdr field, enter one of the following to indicate the order in which you want each zone picked:
A - Ascending. The location range is picked from its beginning location to its ending location.
D - Descending. The location range is picked from its ending location to its beginning location.
Press Esc to save the changes and exit the screen.
More Options for Defining Pick Sequences
The Pick Seq Entry screen also offers these options.
|
Hot Key |
Function |
|
Insert |
Use to insert the current pick sequence ahead of another pick sequence. |
|
Clear |
Use to clear all pick sequences. The system prompts you to confirm the deletion. |
See Also: