To...
Do this...
view the purchase order
Double click the order to display in Purchase Order Entry.
view all records related to the same payable
From the File menu, select Display All Line Items on Payable.
edit cost or quantity as needed
Based on your permissions, these fields are activated. Change the cost or quantity accordingly and apply.
create a Debit Memo for the variance
Click Create Debit Memo in the lower right-hand corner.
Select the type of memo you want to create: Cost Debit Memo or Quantity Debit Memo.
On the Automated Debit Memo window, complete provided fields.
Note: The fields depend on the selection of memo type. For example, for cost debit, you can enter a quote number. For quantity debits, you can select a reason.
The system automatically populates the Debit Memo Amount.
Click Create Debit Memo.
The system creates the memo with a payable number. The number displays at the bottom of this window along with the original payable ID in addition to the Notes area of the Resolve Variance window..
Note: If there are more variances attached to the payable, but are not displayed, the system alerts you.
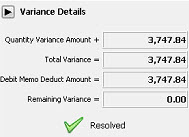
Use the File > Show Resolved Variance menu option to display the variance information.
Close the window.
The Resolve Variance
window and the Notes field
displays the variance details and indicates with a green check
mark if the variance has been resolved with that debit memo. ![]() Click
here to see an example.
Click
here to see an example.
Note: Debit memo information displays in the queue's Notes pane.
apply a credit and rebill for the variance
Click Credit / Rebill.
Select the line or lines you want to apply. You can adjust the quantity and cost for the rebill generation, if needed.
Close the window to apply the credit/rebill.
At the prompt, select the resolution reason and a reason code.
Click OK.
Use the File > Show Resolved Variance menu option to display the variance information.
If there is more than one variance on the payable, the system displays an alert. Click OK to continue with the credit/rebill for the selected line item. Click Cancel to return to the queue and select additional line items.
reassign the variance to another user
Click Reassign Variance.
In the Assign Variance to User field, select the user to whom the variance should be assigned for resolution.
In the Notes field, provide direction or information for why the variance is being reassigned.
Click OK.
add a note for a variance
Click Add Note.
Provide direction or information regarding the variance.
view resolved variances
From the File menu, select Show Resolved Variances.
