About Epicor Automation Studio
Epicor Automation Studio, powered by Workato®, connects your platform with external cloud-based tools that help you automate business workflows across cloud and on-premises applications. This enterprise-grade workflow automation platform enables both business and IT users to efficiently build workflow automation. It can handle problems like integrating applications and data. Automation Studio is designed for security, robustness, reliability, and high performance.
By connecting with these external tools, you design processes, or recipes. These recipes run automatically and handle a task or a series of tasks. Create as many complex or simple recipes as you need. One recipe can automate data between multiple connections, but at least one of these connections must be with your platform.
Each recipe has one or more tasks that you define. Connect these tasks in a workflow that generates the actions you want. Then set up triggers that run each task. The triggers activate automatically through changes from your platform, a cloud-based tool, or a scheduled event. The tasks cause actions to run, such as adding or updating a record.
By creating automated recipes, you make sure data across your organization is up-to-date and reflects current business activity. While you create a trigger, Automation Studio accesses the database tables potentially affected by the task. Once you select a table from this list, Automation Studio then shows the fields inside this table. Select the fields you wish to update in the database.
This is an optional feature; it is not part of the baseline system. You cannot access any of the functionality described here without first purchasing this additional package.
During this article, we explore:
Components of Automation Studio
You can create low-code or no-code workflows using recipes. Every automation workflow is a recipe. Recipes are the building blocks of any automation workflow. They can span multiple applications. A recipe is usually made up of one trigger, one or more actions, and connections. A recipe starts with a trigger, and consists of several actions that it performs after it is triggered. The actions can be of various types:
-
It can be an action performed in an application.
-
It can be an IF condition that is satisfied.
-
It can be an IF//ELSE condition that is verified.
-
It can be a repeat action that is performed for some set of items.
-
It can call another recipe.
-
It can stop a job and/or handle errors.
Recipes can be classified based on the kind of trigger they use:
-
Time-based triggered: You can schedule it minutely, hourly, daily, for a day of the week, etc.
-
Application triggered: These recipes are based on the connector logic.
-
Webhook triggered: These recipes use webhooks as triggers.
-
Functions: These recipes can be called from other recipes.
-
API recipes: API callable from other systems, like, BPMs, functions, etc.
The components of a recipe are:
-
Connections: When you start building a recipe, the first step is establishing a connection between Automation Studio and an application. This application contains a function that interacts with your platform. Each connection is associated with one instance of the app and can be re-used across recipes. For example, a connection can be made with a user account.
-
Triggers: Triggers determine what event listens to execute the actions described in a recipe. They set off, or launch, when a certain event happens or according to a schedule.
-
Steps: Recipe steps are actions or control flow statements that help you describe business logic. Different kinds of steps are:
-
Action Step: Actions carry out an operation in your target app, such as a create, update, or search operation. Each action requires a set of input fields and typically returns data as output data tree.
-
Conditional Step: Conditional steps carry out an If-ELSE decision in the workflow. An IF condition step directs a recipe to run an action or set of actions if the specified condition is met.
-
Repeat Step: Repeat steps are a set of actions that carry out on a set of items. Use them when working with an item list, such as a list of invoice line items. Actions indented within a repeat block are carried out for all items in the list. A repeat step uses output from the repeat step's datatree to ensure that all item in the list are processed.
-
Data Flow in Automation Studio
Datapills are output data from a trigger or an action step. You can use datapills as variables to map business logic into recipe steps.
In every recipe step, you have access to datapills from all the previous steps. Use them to configure the input fields for the current step.
Datapills are contained in App Data section in the Datatree. At any step of the recipe, the App Data section contains the output from the trigger and every action preceding this step.
You can also assign datapills or constants as input fields to a trigger or an action step. This Field Mapping controls the flow of data between the apps.
You can look at the following example to understand how you can use Automation Studio to run your business efficiently.
n use Automation Studio to run your business efficiently.
An Example Recipe
You build a recipe that handles purchase order approvals. A buyer creates a PO within your platform. This triggers an email that Automation Studio sends to the purchase manager. The purchase manager uses this email to view, approve, or reject the PO.
Saving an unapproved PO launches a trigger on the recipe. This trigger activates a task, and the task action sends the PO email notification to the manager. The email contains three triggers that launch three task actions. One trigger displays the PO, another approves the PO, and the third trigger rejects the PO:
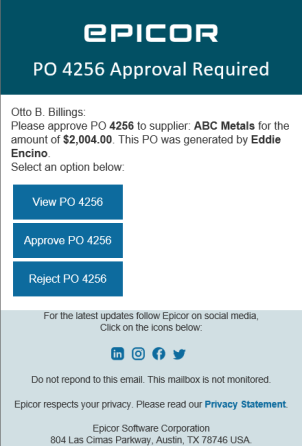
Depending on what the purchase manager selects, Automation Studio runs the view PO, approve PO, or reject PO task. The resulting action causes another task to run on the record, and the buyer sees the approve or reject PO outcome.
Limiting Tasks in Non-Production (Sandbox and Test) Environments
When you run an Automation Studio recipe, it consumes tasks. You typically purchase task bundles from Workato. Sometimes a recipe you are developing in a non-production environment, such as a Sandbox or Test environment, can consume more tasks then you intend. This often happens if a new recipe accidentally processes in a loop. These wasted tasks are an unnecessary expense.
To prevent recipes from consuming too many tasks, non-production environments have a maximum of 10,000 tasks available to consume each month. As the environment gets closer to this monthly limit, you receive alert emails. The first email alerts you when it has used 50-75% of its available monthly tasks. The second email alerts you when the environment consumes 75-99% of the tasks, and the last email alerts you when it reaches the 100% limit. Now if a recipe attempts to run, you receive one final warning email that this environment is over the limit. After this, Automation Studio will stop and you can no longer run recipes in this non-production environment.
Global Administrators can increase or decrease this monthly limit as needed. They make this change on the Integration Portal:
-
Launch Integration Portal and go to the page for the non-production environment.
-
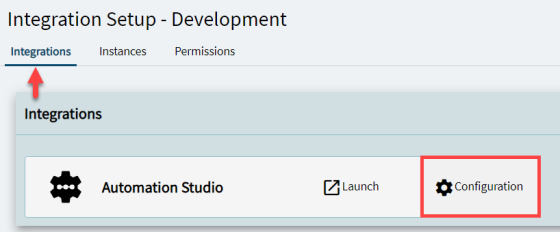
Select the Integrations tab.
-
Select the Configuration button.
-
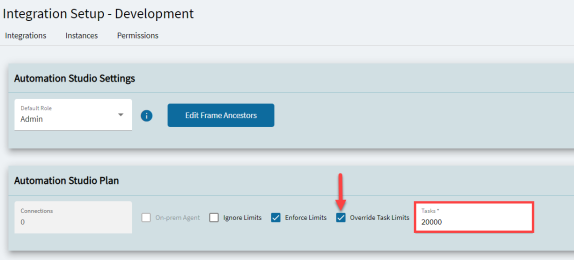
Go to the Automation Studio Plan section. Select the Override Task Limits check box.
-
Go to the Tasks field and enter the new limit.
-
Save the configuration.
If the Global Administrator added more tasks to the monthly limit, Automation Studio will resume and you can run recipes in this non-production environment again.
Accessing Automation Studio Education
Workato Docs
Workato has an extensive documentation site that can help answer your questions. Explore the Workato Docs site to see information on Recipe Design, Connectors, Data and Security, and other key categories. Use the search field to locate the information you need. This site also connects you with update information about Automation Studio.
To launch this site, go to: Workato Docs (https://docs.workato.com/)
Workato Digital Academy
The Workato Digital Academy contains multiple courses which will help you fully leverage Automation Studio within your business environment. Be sure to take several courses to maximize your investment in Automation Studio. You can access the Academy directly through the Workato website or through the Eclipse Automation Studio product window.
Access From Website
To access from Workato Website:
- Copy and paste this link into a webpage tab: https://academy.workato.com/
- Select Login.
-
Log with your account credentials.
-
Go to System Management > Integrations > Automation Studio.
Automation Studio Access
To access from Automation Studio:
-
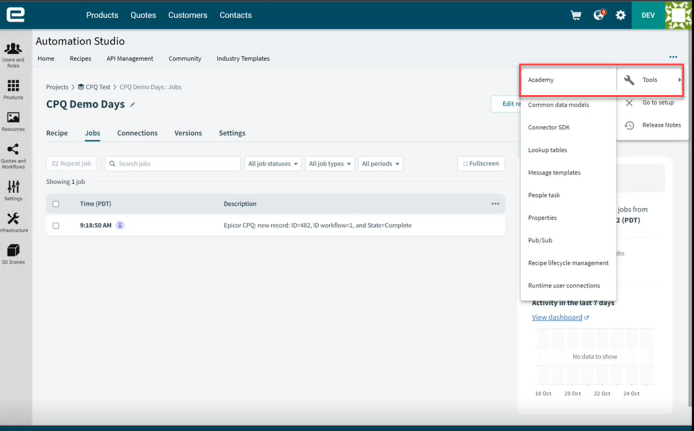
Select the Overflow menu and the Tools sub-menu.
-
Select the Academy option.
Recommended Courses
It is recommended that consultants and engineers take the courses up to at least the intermediate level or more. Some recommended courses are:
- Automation Pro 1: https://academy.workato.com/automation-pro-i-on-demand
- Automation Pro 2: https://academy.workato.com/automation-pro-ii-revised
Integrating Automation Studio with Eclipse
This is an optional feature; it is not part of the baseline system. You cannot access any of the functionality described here without first purchasing this additional package.
After you purchase the Automation Studio license for Eclipse, work with Professional Services to register the license to activate the Eclipse configuration windows. There are a few steps to establish the general connection to Automation Studio, create the settings for how you are using Automation Studio, and determine who is using Automation Studio.
Professional Services will work with you to create your Automation Studio site, environment, and instance. Once this is done Automation Studio will perform a "handshake" with your Eclipse system to populate most of the settings on the API Configurations window for the Epicor Automation Studio pane.
During the registration process, permissions are established for the first user of Automation Studio. The person you have as the Automation Studio administrator and all those given access to Automation Studio need to have the Authorization Key for Admin or SuperAmin on Eclipse to access Automation Studio. In addition, you must be set up on Automation Studio as a user and given appropriate permissions.
Refer to the following sections for:
-
Completing the General Settings to Connect to Automation Studio
-
How to Access Automation Studio from Eclipse
-
Setting up the Webhook for your Recipe
Completing the General Settings to Connect to Automation Studio
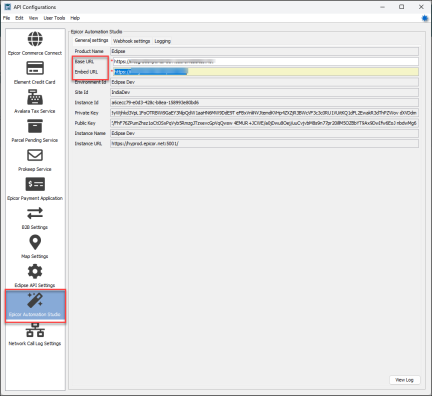
When you register the Automation Studio with Eclipse, the Epicor Automation Studio pane is available. The registration process populates most of the fields on the General Settings tab and they are read-only. These settings are unique for your company and based on your purchase information with Automation Studio.
Establish the connection between Eclipse and Automation Studio as follows.
-
Navigate to the API Configurations window and then select the Epicor Automation Studio pane.
There are just two fields that are open for configuration, the other fields are read-only fields and are automatically completed during the registration process.
-
On the General Settings tab, enter the Base URL to use for opening the Automation Studio Eclipse page.
https://api.integration.epicor.com
When you select the Automation Studio menu option in Eclipse it opens a separate Eclipse window that uses this URL.
-
Enter the Embed URL to use for the populating the Automation Studio page within the Eclipse Automation Studio page frame.
https://integration.epicor.com
How to Access Automation Studio from Eclipse
Once you complete the registration and integration process, it is easy to access Automation Studio from Eclipse.
Navigate from the Eclipse Main Menu to System > System Programming > Add On Products > 8 - Automation Studio. Alternatively, you can access Automation Studio through the Solar Search bar. Automation Studio opens in a separate window.
Setting Up the Webhook for Your Recipe
Before you can execute a function or process in Eclipse using Automation Studio you need to:
-
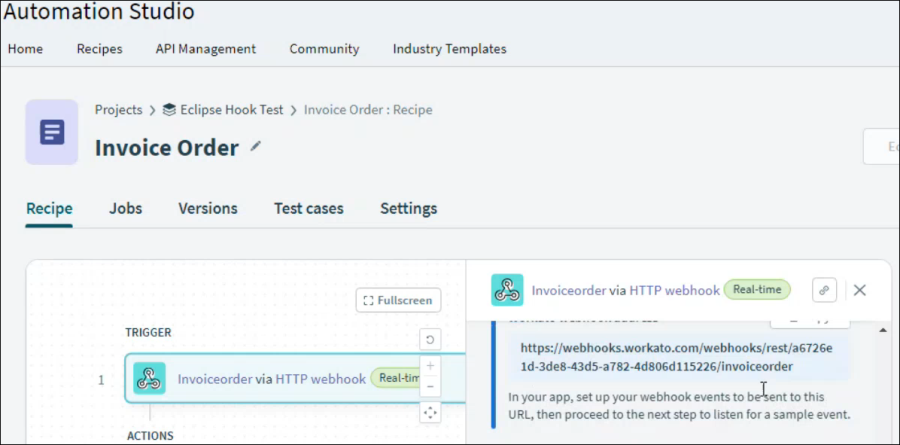
Create a "Recipe" in the Automation Studio window.
-
On the Recipe page in Automation Studio, copy the webhook address.
-
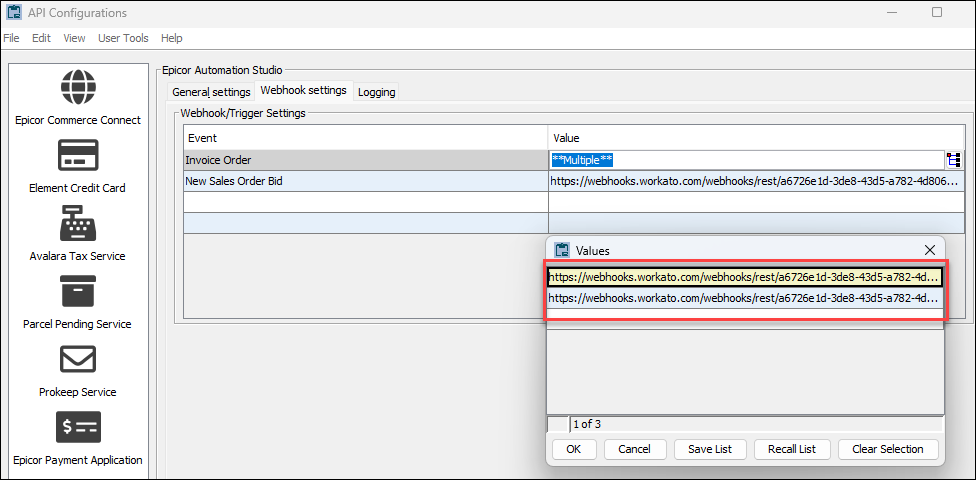
Open API Configuration to the Eclipse Automation Studio panel and select the Webhook Settings tab.
-
In the Value field, past the webhook that you copied from the Automation Studio recipe page.
-
In the Event field, select the Event name that represents the recipe.

Logging
Use the Logging tab on the Epicor Automation Studio configurations to turn on and off logging for:
-
Automation Studio
-
Automation Studio Order Processed Webhook