Once you have brought in the Eclipse unreconciled items into the Bank Reconciliation grid, then you can begin to match those items with your bank statement.
There are two methods you can use for reconciling the items.
Refer to a paper or electronic bank statement and use the reconciliation grid to manually mark the items that match.
Import your bank statement and use the auto-match feature and manual match feature.
Before beginning your reconciliation, follow the set up step in the Reconciliation Settings topic. When using either reconciliation method, you have to acquire your ending bank statement balance from your bank statement, whether paper or electronic.
Once you have brought in the unreconciled items that are in the system into the Bank Reconciliation grid, then you can begin to match those items with your paper or electronic bank statement.
You can mark the items in the grid as they come into your bank, or wait for an end-of-month statement. You can use a combination of both methods. Use the Bank Reconciliation utility as it suits your business practice.
With your bank statement available, find a match for your bank item with the system item. Select the Reconciled check box to indicate the system item that matches the statement item. When you select the Reconciled check box, the system automatically selects the Cleared check box.
If you are not working from the end-of-month statement, you can just mark the Cleared check box for a match with your bank information (likely the current online bank view).
You can mark the items in the grid as they come into your bank, or wait for an end of month statement. You can use a combination of both methods. Use the Bank Reconciliation utility as it suits your business practice.
Using your bank statement:
Find a match for your bank item with the system item.
Select the Reconciled check box to indicate the system item that matches the statement item. When you select the Reconciled check box, the system automatically selects the Cleared check box.
Before end of month statement and using bank information from you current online bank transactions.
Find a match for your bank item with the system item.
Select the Cleared check box for a match with your bank information (likely the current online bank transactions).
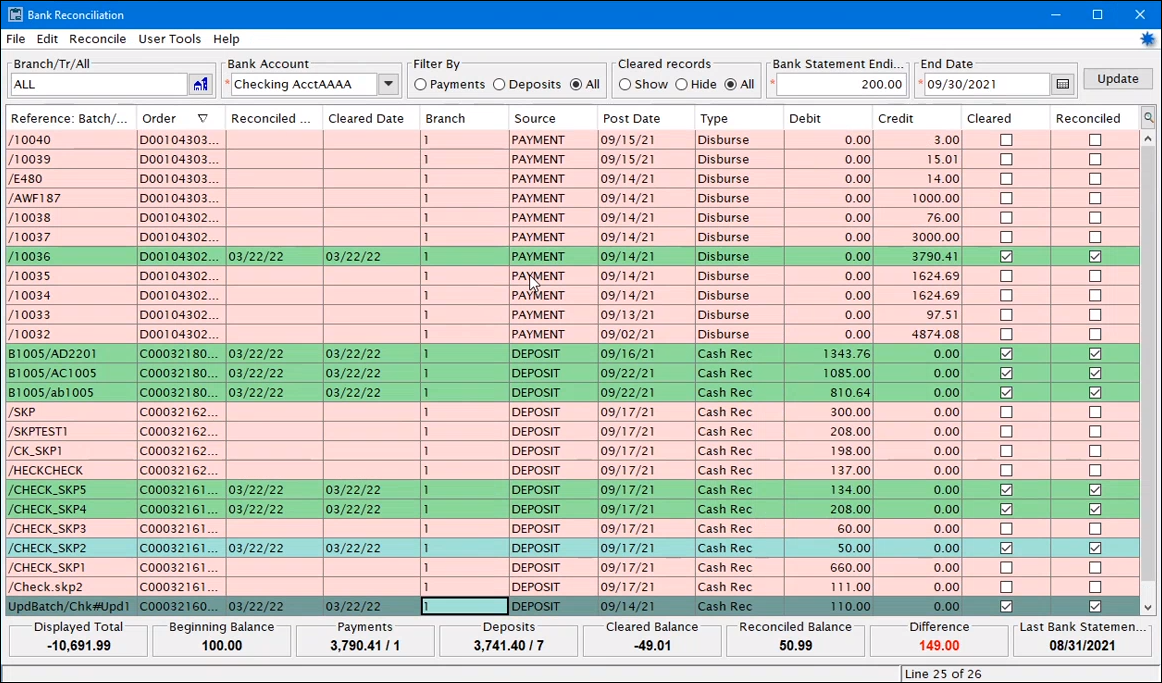
The line items are color coded for the reconciliation status.
Unreconciled items are red colored rows.
When you select the Cleared check box the row changes to a blue color.
When you select the Reconciled check box, the row is green.
Once you have brought in the unreconciled items that are in the system into the Bank Reconciliation grid, then you can import your bank statement data to begin the matching process. By importing the bank data into the Eclipse Bank Reconciliation utility you work with accurate bank data within Eclipse and are able to automate some tasks.
Reconciling by importing the bank data involves:
Using a new profile, on the Import Profile Maintenance window, that you design and designate for bank reconciliation.
Importing bank data into the Bank Reconciliation utility.
Running the matching functionality.
Manually matching items that the system did not automatically match.
Completing the reconciliation work in the Bank Reconciliation window.
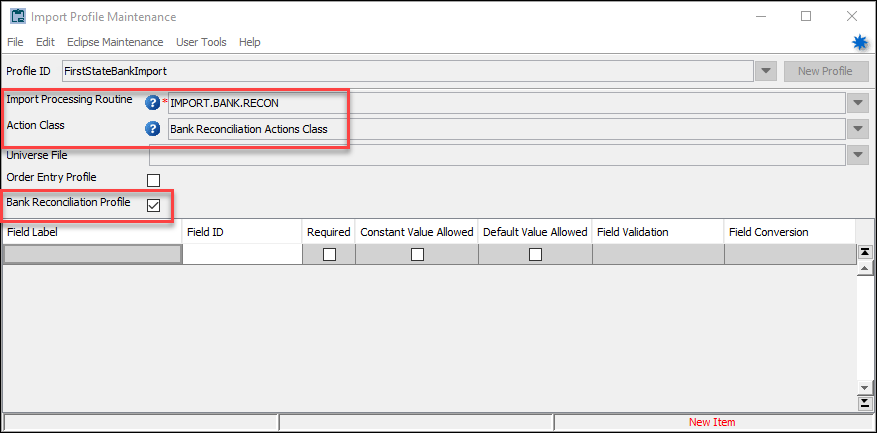
The system uses a new type of import profile for importing your bank data into Eclipse. You create the new profile in the Import Profile Maintenance window using the following new settings.
Select the new Bank Reconciliation Profile check box. This allows the system to present this for use in the Bank Reconciliation window. When you select the Bank Reconciliation Profile check box the system populates the Import Processing Routine and the Action Class.
For the Import Processing Routine, select IMPORT.BANK.RECON. This indicates that the system is to process a bank data import. When you select the Bank Reconciliation Profile check box the system populates the Import Processing Routine.
For the Action Class, select the Bank Reconciliation Actions Class. When you select the Bank Reconciliation Profile check box the system populates the Action Class.
The rest of setting up a profile are the typical steps and based on the data your bank file provides to import. Refer to the help for "Creating Import Profiles."
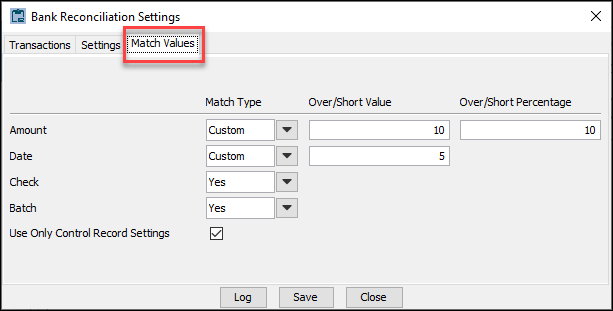
For the system to utilize the automatic matching function, you identify the parameters under which it operates. You do this in the Bank Reconciliation Settings, Control Maintenance record.
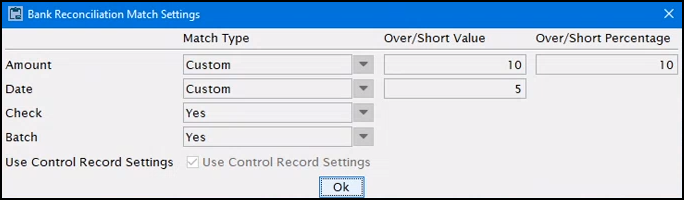
Locate the control record, Bank Reconciliation Settings. Select the new tab, Match Values. You can set the following parameters.
Amount - Set to Don't Match, Custom, Exact. For Custom, you further define the amount with values in the Over/Short Value and Over/Short Percentage fields.
Date - Set to Don't Match, Custom, Exact. For Custom, you further define the date with the Over/Short Value field.
Check - Set to Don't Match or Yes.
Batch - Set to Don't Match or Yes.
Select the Use Only Control Record Settings check box to prevent changes to the match parameters from the Bank Reconciliation window. If this is not set, the parameters can be changed in the process of the bank reconciliation.
Through the Bank Reconciliation window you operate the reconciliation process that includes the new import feature and the new transaction matching function. Being able to use these new features through the Bank Reconciliation window makes the reconciliation a seamless process.
The overall process of importing and matching includes:
In the Bank Reconciliation window, define your reconciliation criteria and update the grid with the Eclipse data.

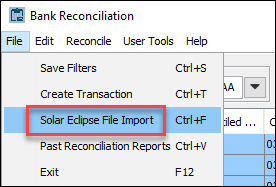
Run the bank file import by accessing from File > Solar Eclipse File Import.
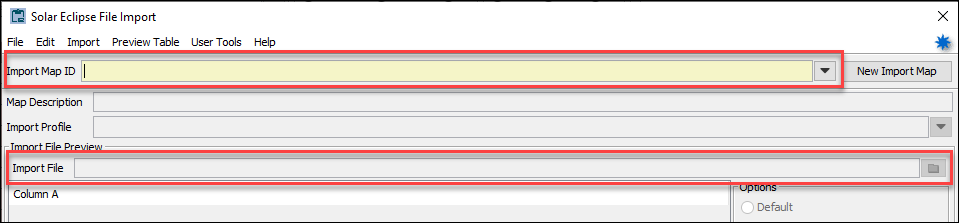
The system opens the Solar Eclipse File Import window. You select the bank reconciliation profile, select the file to import, and run the import from the Solar Eclipse File Import window.
Confirm the auto-match settings. After the import is complete the system displays the Bank Reconciliation Match Settings window. Depending on your system setup, you may be allowed to change the match parameters.
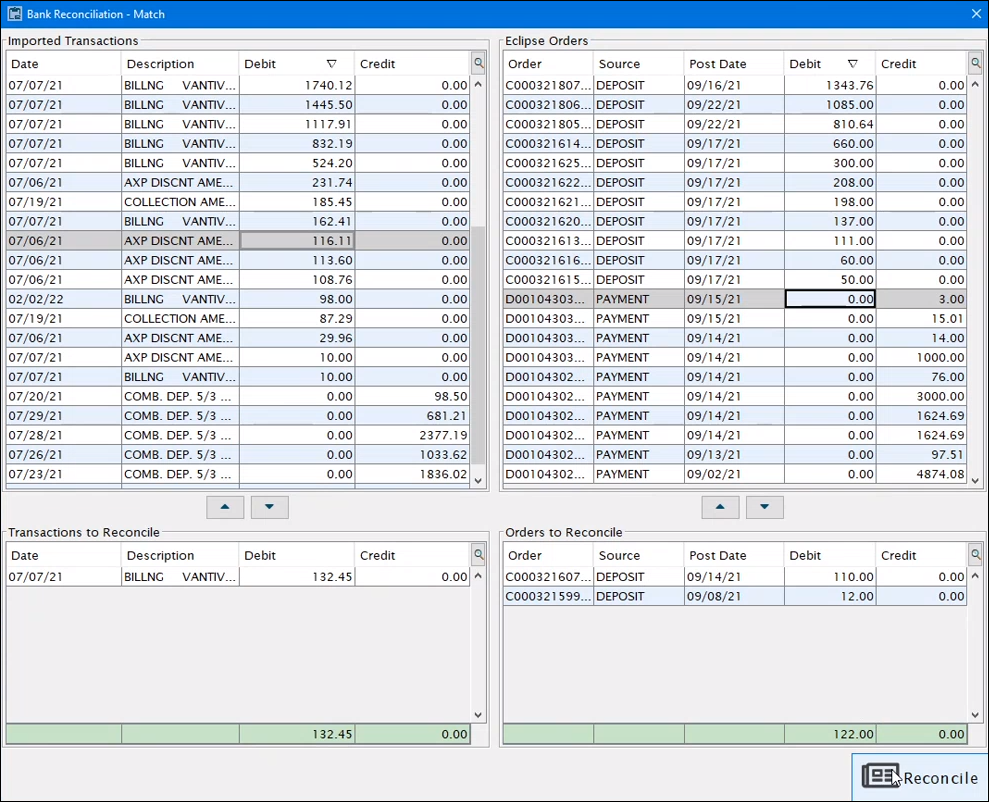
The system runs the auto-match process. When auto-matching is complete, the system displays the Bank Reconciliation - Match window. In this window, the system displays all transactions that it could not automatically match.
Complete the manual matching process until all bank transactions are addressed.
Finish reconciling using the main Bank Reconciliation window to make adjustments and verify total difference is appropriate.
The Bank Reconciliation - Match window is arranged with the top sections containing the bank transactions on the left and the Eclipse transaction on the right. When you select items in the top section to work with, the items move to the bottom sections. As you work with the transactions in the bottom section, you use the totals under each section to see if the items match. Once you are satisfied with the matching items, you select Reconcile. If the items don't match when you select Reconcile, you have the option to continue working with the items, accept the items and make an adjustment entry or continue the match with a difference. When you are done manually matching items in the Bank Reconciliation - Match window, you return to the main Bank Reconciliation window.
Complete the reconciliation on the main Bank Reconciliation window. In the reconciliation grid you can see transactions highlighted in different colors. There are different shades of green for transactions that the system automatically reconciled and those that you manually matched. If you mark a transaction in this window as reconciled, it is a third shade of green. All items that are not reconciled are a different color.
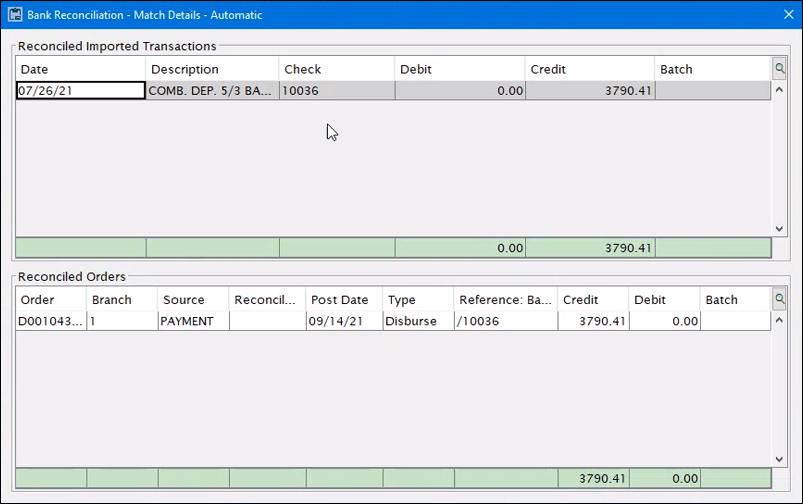
You can research the transaction matching that was done. While on the transaction, right-click and select Match Reconciliation Details from the context menu.
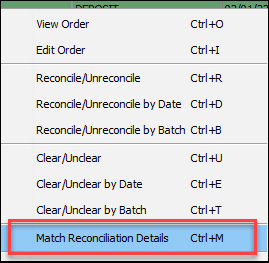
The system displays the Bank Reconciliation - Match Details window. The top portion is the bank transaction and the bottom portion is the Eclipse transaction.
If you find that you need more information, need to do further research on a transaction, or make adjustments, you have the following options.
You can change the Reconciled Date on the Bank Reconciliation window. If needed for your reconciliation process, you can enter a different date in the Reconciled Date field. To edit the Reconciled Date, you need to have the Authorization Key BANK.RECON.DATE.EDIT. If you do not have this key, the field will be read-only and you will not be able to make any changes.
You may find that the Description column with the vendor on the Bank Reconciliation window makes it easier to identify a debit/credit item. With the vendor along with the order, amount and date allows you to match to the transaction on your statement. You can add the Description column by using the View icon button  and choosing it from the menu.
You can access the Cash Receipts window directly from the Bank Reconciliation window. With the line item selected right-click and select View Order or Edit Order. The options are also available from the Edit menu.
Use the new Bank Reconciliation Settings control record to set the adjustment transaction types that your bank typically charges. The control record also lets you set the date the system searches for unreconciled transactions. With these set up you can use the Create Transaction option found on the File menu. This lets you add a transaction line to the grid to use for reconciling the balance to zero.
Select the transaction type, amount, and the date. The line is added to the grid. The item is automatically marked as reconciled.
![]()
To use the Bank Reconciliation utility you need the Bank.Reconciliation authorization key assigned to your user account. This also determines the level of access that you have.