Bar Coding Warehouse Locations
When you set up your warehouse, identify and label every location with
a bar code. Remember that you define bar code formats for warehouse locations
in Product
Location Layout Maintenance.
Give thought to the flow of the warehouse, including setup and positioning
of racking within the warehouse. In organizing your warehouse, consider
the following questions if you were to have an order that includes every
item in your warehouse:
-
To pick this order in the
most efficient manner, where would you start?
-
What path would you follow
to pick the entire order? Keep in mind sections of the warehouse where
you have product that requires a forklift — these areas can be segmented
to a different pick group. Also keep in mind areas and items that
do not lend themselves to bar coding, such as pipe in the yard.
Tips for Barcoding Locations
When creating bar codes for locations, keep
the following tips in mind:
-
If your zone label is numeric,
you can assign three digits to the first part of the sequence to indicate
the zone and aisle. For example: 102-04-B
(Zone 1, Aisle 2, Section 4, Shelf B). The
next section would be204-05-C(Zone 2, Aisle 4, Section 5, Shelf
C). This approach reduces the number of overall characters
required in a warehouse location.
-
If you enter a location manually
on an wireless
terminal, you must type all characters. Limiting the number of characters
can be advantageous to speed up the process.
-
If you use alpha characters
to define a zone, segment the alpha and numeric code with a dash.
For example: W-01-03-07-A
(Zone W, Aisle 1, Section 3, Shelf 7, Bin A).
To bar code a range of
shelves:
-
Display the Shelf Label Printing
screen, in one of the following ways:
-
From the Warehouse
Management > Barcode Labels
menu, select Shelf Barcode Labels.
-
From the Warehouse
Management > wireless Applications > wireless Main Menu >
Misc > Bar Code Labels menu, select Shelf
Barcode Labels.
Note: If
prompted, log on to the system.
In the Branch
field, enter the branch to which you are assigning bar codes.
In the Format
field, if needed, enter the format in which you want the bar codes
to print.
This field populates with data from User Defined Shipping
Labels.
In the Copies
field, enter the number of bar code labels you want to print for individual
bar codes.
In the following location area
fields, enter the range of locations for which you want to print labels.
Use the logic defined on the Location
Layout window for labeling bar code shelf locations.
Field | Set
Up for Picking |
Aisle | Enter the alphanumeric characters to define
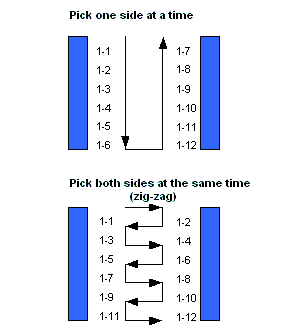
the first aisle for which to print labels. Set up to pick from either: To
set up for zig-zagging, use even numbers on one side of the aisle
and odd numbers on the other. This
differentiating allows you to zig-zag from side to side as you
work up the aisle rather than picking one side of the aisle and
then coming back down the other side. Label with an alpha or numeric character or
both. Note:
The system supports alphanumeric combinations of up to 12 characters,
including dashes. Once you define the warehouse logic, keep it
consistent for all locations. |
Section | Create sections of the aisle as you move
down each aisle. Enter the sections with alphanumeric characters
to define the first section within the aisle for which to print
labels. |
Shelf | Number the shelves from either the floor
up or top down. We recommend labeling from the floor up. After identifying the aisle and section of
the aisle, identify the shelf with the next number. For example, 01-03-07
(Aisle1, Section 3, Shelf 7). When numbering shelves, we recommend leaving
gaps within the numbering sequence (A,C,E
or 01,03,05) to prevent
the need to renumber in the future when shelves are added. If
the numbering begins at the bottom shelf or floor, then it needs
to increase as you move higher. You can reverse this order if
you want to pick from the top to the bottom. |
Bin | Enter alphanumeric characters to label this
additional level of organization within shelves, as needed. For example, 01-03-07-A (Aisle 1, Section
3, Shelf 7, Bin Location A). |
Note: You
can print a range of bar code labels by entering the beginning and ending
locations for each field, separating them with a dash (-)
or space.
For example, enter the following to print bar code
labels for locations 01-01-A,
01-02-A, 01-03-A:
Aisle:
01-01
Section:
01-03
Shelf:
A-A
In each By
field next to the location area fields, enter one of the following:
For example, you use the entries below:
Field | Number
Range | By |
Aisle | 01-01 | 1 |
Section | 01-07 | 2 |
Shelf | A-A | 1 |
Then, the system prints the following bar codes: 01-01-A, 01-03-A,
01-05-A, 01-07-A.
Note: To
print every other number in even increments, enter even numbers as your
beginning and ending numbers. Enter 02-06
for your Section to print 01-02-A, 01-04-A,
01-6-A.
Use the Print
hot key to print the bar codes and exit the screen.
Place the bar codes on each
location.
To bar code every warehouse
location:
Display the Zone Range Label
Printing screen, in one of the following ways:
From the Warehouse
Management > Barcode Labels
menu, select Zone Range Label Printing.
From the Warehouse
Management > wireless Applications > wireless Main Menu >
Misc > Bar Code Labels menu, select Zone
Range Label Printing.
Note: If
prompted, log on to the system.
In the Branch
field, enter the branch to which you are assigning bar codes.
In the Beginning
Location field, enter the start of the range.
In the Ending
Location field, enter the end of the range.
In the Location
Status field, press F10
and select one of the following location statuses for which to print
location bar codes:
P
- Primary-status locations.
S
- Secondary-status locations.
F
- Floating-status locations.
If you leave this field blank, bar code labels print
only for Blank-status locations.
Note: From
this screen, you can only print location bar codes for locations with
a Stock location type. To print
location bar codes for other location types, such as Defective,
use the Shelf Label Printing screen.
In the Format
field, press F10 and select
the format on which to print the bar code labels, as needed. This
field populates with data from User Defined Shipping Documents.
In the Copies
field, enter the number of copies for each label you need to print.
Use the Print
hot key to print the bar codes and exit the screen.
Use the Opts hot key to schedule another
time to print the bar codes.
Place the bar codes on each
location.
See Also:
Tasks Not Available
in Solar
Defining
Bar Code Formats for Warehouse Locations
Warehouse Preparation
for wireless Installation
Wireless Bar Code Labeling Overview
 (zig-zagging).