When there is a number in the
Picking tile on the dashboard,
select the tile to start the picking process. The system displays
the Picking card. 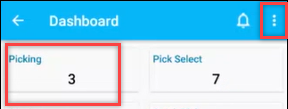
Once you have picks assigned, you can access them through your device and begin picking them.
To perform a pick:
When there is a number in the
Picking tile on the dashboard,
select the tile to start the picking process. The system displays
the Picking card.
Note: The number on the Picking tile tells you how many picks are assigned to you.
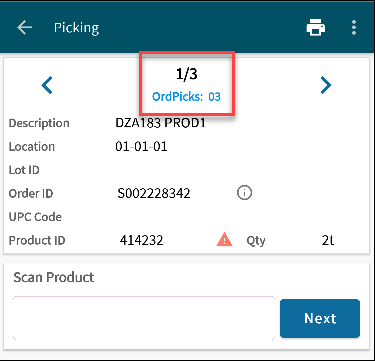
With the system displaying the first pick in your list, scan the item description, UPC code, or product number to confirm you are picking the correct item; the system accepts any of these.
You don’t have to manually count each item or scan the location and tote multiple times. Use the Multi Scan Mode option to scan the location and tote once, and then scan the UPCs as needed.
The top number shows you the pick number out of the total of picks for the order. The "OrdPicks" field on the window shows the number of remaining product picks assigned to you that you need to complete. The number decreases with each pick completed to allow you to keep track of the remaining picks for the order.
Note: You can also manually enter one of these three codes instead of scanning, but if you enter the product number, you must start with a period. Hit Next.
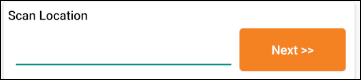
Scan or enter the tote. Select Next.
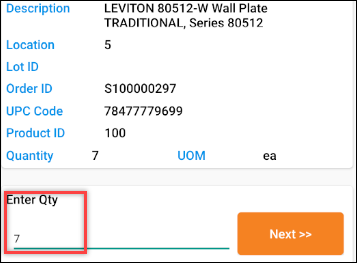
The Current Quantity field displays the stock availability at the warehouse location selected.
Perform the pick as described above, but when you enter the pick quantity, adjust it down to the amount you're actually picking.
The system asks for a reason for the underpick. You have two choices:
Hit Next, and return to the standard picking procedure.
Perform the pick as described above, but when you enter the pick quantity, adjust it up to the amount you're actually picking.
Hit Next, and return to the standard picking procedure.
To perform a pick:
From the Warehouse Management > RF Applications > RF Main Menu, select Picking to display the Pick In Process screen.
Note: If prompted, log on to the character-based system.
In the Br field, edit the branch for which you are picking, if necessary.
The system displays "No Picks Queued" on the screen if you have not already been assigned or selected an order to pick.
Use the Slct hot key to choose an order to pick on the Pick Select screen.
In the Pick Group field, enter one of the following if the correct pick group is not displayed:
ALL - Selects from all orders that need to be picked.
The pick group ID - Indicates the warehouse area from which to pick, such as Y for Yard. The screen only displays orders for the indicated pick group.
Asterisk (*) - Displays only orders defined for multi-zone picking.
Note: If you are selecting cuttable products, use the Scan Prd hot key to select all like products that need to be cut together.
The system enters your pick group, as defined in User Maintenance, as the default, and the following data:
Field | Description |
Order Wt | If the |
Total Wt | If the |
Orders | The orders queued to pick display in the following way: ACME Canadian With the displayed data representing the following:
|
Note: If an asterisk (*) appears as a pick group after the number of picks, then the pick is a complete order combined from multiple zones. | |
If the Auto Display Comments Attached To Line Items In RF Picking control maintenance record is set to Yes, then line item comments display after the scanning a product. If line item comments do not automatically display, users can use the hot key to display attached comments, if any. | |
Use the Auto Display Shipping Instructions In RF Picking and Auto Display Shipping Instructions In RF Staging control maintenance records to set shipping instructions to display. Users can access the shipping instructions with the Alt-I hot key which highlights when instructions are attached. |
If any items require Mill Test Report heat numbers, the RF Heat Number Entry screen displays. Enter the heat numbers and continue.
Place
the cursor next to each order
Note: Press
Enter again to de-select the order
Press Esc to return to the Pick In Process screen.
To define a one-pick ship via and combine a full order across multiple zones:
From the Maintenance > Branch menu, select Branch to display the Branch Maintenance window.
In the Branch field, enter the branch for which you want to define the one-pick ship via.
From the Maintenance menu, select Ship Via Branch Overrides to display the Ship Via Branch Overrides window.
In the Ship Via field, select the ship via to define as a one-pick ship via.
From the Additional menu, select Branch Ship Via Additional Data to display the Branch Shipvia Additional Data window.
In the Combine All Zones In RF Pick Select field, select the check box to combine all cross-zone full orders assigned to the selected ship via into one pick.
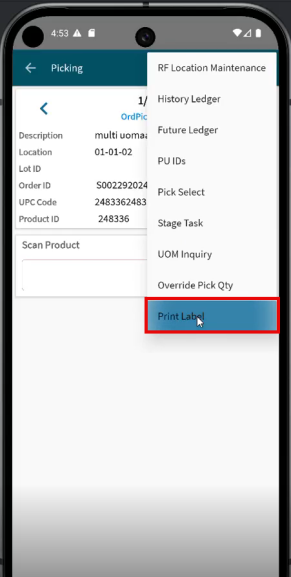
To print a label:
Navigate to the Picking screen in WMS, and select the Overflow menu  on the top-right to access the Print Label option.
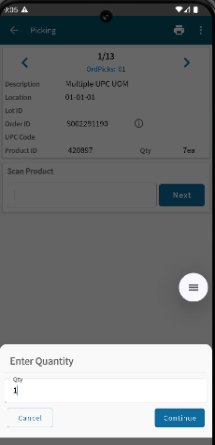
After selecting Print Label, a pop up appears to enter the quantity.
Currently the default value is 1.
Select Continue to get the list of printers.
Now, select a printer to print the label.
A message appears confirming the printing is completed.
See Also:
Performing Multiple-Operator Picking in Wireless
Selecting Orders to Pick in Wireless
Automated Wireless Pick Allocation Logic
Staging and Closing Non-Manifest Orders Using Wireless
Staging and Closing Multiple-Operator Picks in Wireless
Performing Zone Picking in Wireless
Using System-Directed Loading with Wireless Non-Manifest Picking