You can view orders to pick through your wireless device on the Pick Select screen and in Eclipse on the Warehouse In Process Status Queue rather than printing a pick ticket. To select orders to pick, access the Pick Select screen on your wireless device.
The orders
For example, if an order needs to be picked and the products on the order are in pick groups A, B, and C, the system lists each pick group as a separate pick.
If you want a pick that crosses multiple zones to be combined into one pick, such as orders placed at the counter, define the ship via containing the pick as a one-pick ship via. Using the example above, if you define the ship via for that order as a one-pick ship via, the order displays as a pick on one line only and with a pick group of multi-zone (represented by an asterisk *). On the Pick Select screen, enter an asterisk (*) in the Pick Group field to view all multi-zone picks.
If ship via priorities
are set in Ship Via Priority Maintenance, the system displays all orders
in the queue based on this sequence. Ship via sorting priorities can also
be defined in the Wireless
Pick Selection Sort control maintenance record.
Three instances can occur which make it unnecessary for you to select an order from the Pick Select screen:
If the
If
you pick from routing tickets and they have been set
to print for your branch, use them to enter the order into your
device. With the
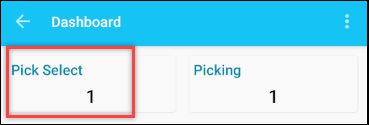
If you have picks assigned from the Warehouse In Process Status Queue, the system shows the number of picks you have to do on the Picking tile of the Dashboard card.
To select an order to pick from the Pick Select screen:
After you log into your device, from the Dashboard tap the Pick Select tile.
Note: If you don't have any open picks assigned to you, the system doesn't show you the Pick Select card. In this case, open the menu inside the Picking screen and hit Pick Select.
In the Pick Group field, enter one of the following if the correct pick group is not displayed:
ALL - Selects from all orders that need to be picked.
The pick group ID - Indicates the warehouse area from which to pick, such as Y for Yard. The screen only displays orders for the indicated pick group.
Asterisk (*) - Displays only orders defined for multi-zone picking.
The system enters your pick group, as defined in User Maintenance, as the default.
The orders queued to pick display in the following way:
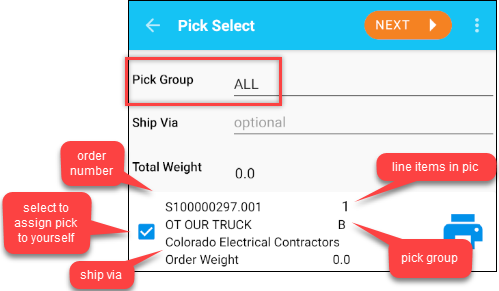
Check the box for any pick you want to assign to yourself.
Select Next to start picking or the back arrow to return to the Dashboard.
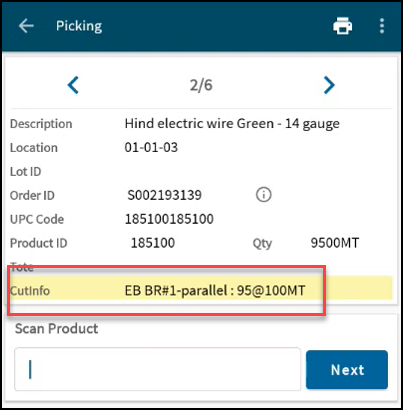
View product cut information on the Picking screen. When picking a product that requires it is cut, you can see the specifications on the Picking window. The system provides information during picking without going to another source for the cut specifications. The Cutinfo field on the Picking page is only visible for products specified for cutting.
To select an order to pick from the Pick Select screen:
From the Warehouse Management > RF Applications > RF Main Menu, select Picking to display the Pick In Process screen.
Note: If prompted, log on to the character-based system.
In the Br field, edit the branch for which you are picking, if necessary.
The system displays "No Picks Queued" on the screen if you have not already been assigned or selected an order to pick.
Use the Slct hot key to choose an order to pick on the Pick Select screen.
In the Pick Group field, enter one of the following if the correct pick group is not displayed:
ALL - Selects from all orders that need to be picked.
The pick group ID - Indicates the warehouse area from which to pick, such as Y for Yard. The screen only displays orders for the indicated pick group.
Asterisk (*) - Displays only orders defined for multi-zone picking.
Note: If you are selecting cuttable products, use the Scan Prd hot key to select all like products that need to be cut together.
The system enters your pick group, as defined in User Maintenance, as the default, and the following data:
Field | Description |
Order Wt | If the |
Total Wt | If the |
Orders | The orders queued to pick display in the following way: ACME Canadian With the displayed data representing the following:
|
Note: If an asterisk (*) appears as a pick group after the number of picks, then the pick is a complete order combined from multiple zones. | |
If the Auto Display Comments Attached To Line Items In RF Picking control maintenance record is set to Yes, then line item comments display after the scanning a product. If line item comments do not automatically display, users can use the hot key to display attached comments, if any. | |
Use the Auto Display Shipping Instructions In RF Picking and Auto Display Shipping Instructions In RF Staging control maintenance records to set shipping instructions to display. Users can access the shipping instructions with the Alt-I hot key which highlights when instructions are attached. |
If any items require Mill Test Report heat numbers, the RF Heat Number Entry screen displays. Enter the heat numbers and continue.
Place
the cursor next to each order
Note: Press
Enter again to de-select the order
Press Esc to return to the Pick In Process screen.
To define a one-pick ship via and combine a full order across multiple zones:
From the Maintenance > Branch menu, select Branch to display the Branch Maintenance window.
In the Branch field, enter the branch for which you want to define the one-pick ship via.
From the Maintenance menu, select Ship Via Branch Overrides to display the Ship Via Branch Overrides window.
In the Ship Via field, select the ship via to define as a one-pick ship via.
From the Additional menu, select Branch Ship Via Additional Data to display the Branch Shipvia Additional Data window.
In the Combine All Zones In RF Pick Select field, select the check box to combine all cross-zone full orders assigned to the selected ship via into one pick.
See Also:
Picking Non-Manifest Orders Using Wireless
Performing Multiple-Operator Picking in Wireless