Sales Order Entry consists of five tabs: Body, Header, Totals, Status, and Detail Scheduling. Each tab contains a different type of order information. As you enter an order, the system moves from one tab to the next, allowing you to enter related details, one tab at a time.
Some orders do not require you to enter information on every tab. As you complete each required tab, the system displays the next required tab. You can also click on any tab to view or enter details for that tab, whether it is required or not.
No matter which tab is displayed, the top of the window always shows the Bill To and Ship To information, and the bottom of the window always shows the order number and order status.
For information about the Order Summary Pane, see
Note: To display the associated G/L postings on an order, press Alt+~ from the Body, Header, Status, or Detail Scheduling tab.
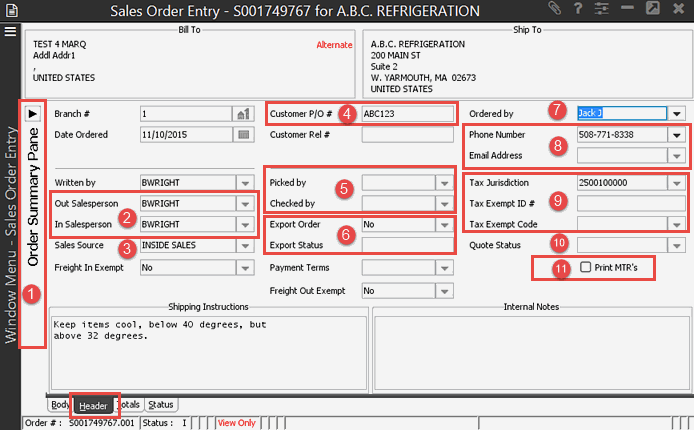
Use the Header tab to view and enter administrative information that applies to an entire order, such as a customer’s purchase order number, tax exempt information, salesperson information, and shipping instructions. If the customer requires you to enter a purchase order number, the Header tab displays automatically during order entry.
To change a customer on an existing order, click Edit on the Header tab and adjust the customer. If the customer is setup for Export Compliance, you are prompted to indicate if the order is now an export order.
Note: If you are working with a Job Management order, you may be unable to change the Ship To field, depending on if the order is shipped. Refer to the Job Management online help attached to the Job Management application for more information.
Review the following about the Header tab:
You can display the Order Summary Pane to view additional payment information. If creating a Direct Through Stock sales order, the Customer PO #, Customer Rel #, and Job Bid Name are copied from the original sales order.
You must have the SOE.SALESPERSON.EDIT authorization key to edit either the In Salesperson or Out Salesperson fields unless you are the salesperson on the order. Changes will be pushed to any open order generations. A message is sent indicating which orders have been updated.
Note: Highlighted
fields are user-defined and can be managed through the User Tools. For
more information, see
In most cases, the system automatically
populates the Sales Source
field based on your workstation
setup.
If you are using Job Management and need to change the Customer PO# field, you must be assigned the SOE.JM.EDIT.CUST.PO authorization key.
If you use order checkers in
the warehouse, use the Checked By
field to indicate which user checked the order. Users must be marked
as checkers in User
Maintenance. If you want users to check orders outside their home
branches, then the
Manage orders requiring export compliance using the Export Order and Export Status fields. Those orders being exported out-of-country that require following export regulations.
The customer purchasing agent
placing the order. If authorized order placers have been established
in Customer Maintenance
and the
The ship-to customer's phone number and email address based on Customer Maintenance. If the Ordered By field is populated, this is the contact's phone number and email address from Contact Maintenance. You can change the phone number or email address for the customer or contact, if you are authorized. For more information about these header fields and permissions, see Entering Additional Sales Order Header Information in this documentation.
If you use a companion product, such as Web Integration, Web Order Entry, or Eclipse Mobile, to e-mail sales orders and select **AUTO** in the Address field, Eclipse uses the e-mail address in the Email Address field from the SOE Header tab to send the information. This e-mail address takes precedence in the hierarchy when sending sales orders.
Manage your tax jurisdictions. You must have the SOE.TAX.EDIT authorization key to edit any of the tax related fields.
Manage
the Quote Status field values
through the Header tab. Use
the
Use the Print MTRs check box to print mill test reports for required products. For more information, see Mill Test Reports in the Product Maintenance online help documentation.
Also, you can define information for the customer specific to the order. For more information, see the following:
Entering Sales Order Header Information, such as:
Customer P/O and customer release Numbers
Entering Additional Sales Order Header Information, such as:
Mark orders for exceptional sales or handling charges
Enter New Sales Opportunities (Edit > Sales Opportunity Maintenance)
See Also:
Sales Order Entry Body Attributes
Sales Order Entry Status Attributes