Creating Banner Ads
You can create an introduction banner, full banner, or half banner for your web advertising:
-
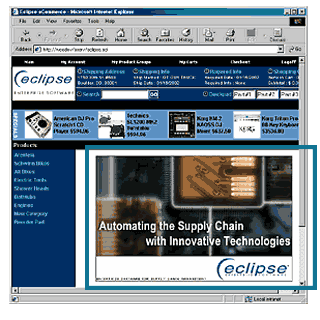
The  introduction banner ad displays in the shopping section of the main shopping cart page. After you click a product category, product, or link, the selected information replaces the banner ad. If you have multiple introduction banner ads, the web site displays them randomly when customers log in.
-
Full and half banner ads display on all shopping pages. Web Commerce randomly selects the ads each time a new page displays.
|
Banner Type
|
Pixels Wide
|
Pixels High
|
|
Intro
|
470
|
300
|
|
Full
|
470
|
60
|
|
Half
|
235
|
60
|
Banner advertising is only available in Web Commerce Level 2 sites.
To use banners:
-
Using an image-editing program, create the banner ad image in a web graphic format, such as GIF or JPEG.
-
Store the image in the \\
-
Set up the ad by specifying how and when the banner displays using the procedure below.
To control how a banner ad displays:
-
Display the system.
Note: The banner advertising functionality has not been incorporated into Solar Eclipse as of this release.
From the System > Custom > Web Commerce menu, select Web Banner Ad Maint to display the Ad Banner Maintenance screen.
In the Banner ID field, enter an ID up to 20 characters in length for the advertisement.
Press F10 and select New or an existing ID.
In the Banner Type field, press F10 and select INTRO, FULL, or HALF to indicate advertising type.
In the Target Type field, select the type of target, such as product or family, and press Enter.
The system prompts you to indicate the target associated with the target type. Clicking the banner ad displays the linked target, which can be a web address, product, and so on.
If Target Type is... | Then Target prompt displays... |
URL | the web site address. When prompted, enter a web address. For example: http://www.vendorcompany.com |
Product | the product ID. When prompted, enter the Eclipse product ID. |
Family | the product family ID. When prompted, enter the product family ID. |
No Target | no target. The banner displays with no links. |
Use the Expand hot key to enter or view a target that requires more space than the Target field supplies.
In the Start Date and Exp Date fields, enter the starting and expiration dates for the banner display.
In the Expire Qty field enter the number of times the ad displays. After it reaches this number, the banner no longer displays. This field is optional.
In the Weight field, press F10 and specify a weight between 1 and 10. A banner with a weight of 10 displays more often than a banner with a weight of 1.
Note: When using multiple banners of the same type, the system displays them according to an algorithm that considers weight.
In the Cust Type field, press F10 and select a customer type to limit the banner display to just those customers. For example, just Electrical customers. This field is optional.
In the Image Path field, enter the web site address for the image. For example: http://www.yourcompany.com/woeb/images/
In the Description field, enter notes about the banner to display as a mouse-over note on the web site.
For example, you may display an advertisement for a percent discount on a product. If you require the customer to buy a certain amount to receive the discount, enter that information in the Description box. When the customer moves the mouse cursor over the advertisement, the additional information displays.
If you linked the banner to a target in step 4, use the Test hot key to test the link.
If the link is successful, your web browser displays the linked item. If your link is unsuccessful, the browser informs you that it cannot find the page to which you are trying to link.
To view detailed statistics, use the Details hot key. For information about the hot key or the Ad Banner Maintenance screen summary statistics, see Viewing Banner Ad Statistics.
Press Esc.
See Also:
Banner Advertising Overview
Creating Images for Web Commerce
![]() introduction banner ad displays in the shopping section of the main shopping cart page. After you click a product category, product, or link, the selected information replaces the banner ad. If you have multiple introduction banner ads, the web site displays them randomly when customers log in.
introduction banner ad displays in the shopping section of the main shopping cart page. After you click a product category, product, or link, the selected information replaces the banner ad. If you have multiple introduction banner ads, the web site displays them randomly when customers log in.